Request Workflow and Response workflow tab is included when the user defines Request has workflow and Response has workflow in Application Settings tab. Workflow Tab provides two options: Create a new workflow or select an existing workflow from the drop-down menu.
1. Create a new Workflow: To create a new workflow, simply click on the “Create new Workflow” button. This action will open the Workflow Designer window, where user can drag and drop different items available in the left pane and design a workflow that suits the application’s needs. The Workflow Designer provides a user-friendly interface that simplifies the process of creating workflows. To add a workflow item, drag it from the left pane and drop it onto the main pane.
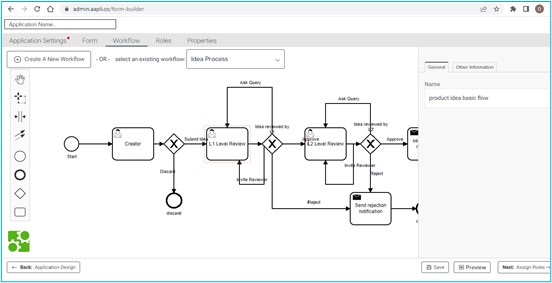
2. Existing Workflow: Alternatively, if user have an existing workflow that user want to use, user can select it from the drop-down menu. The selected workflow will be added to the main pane, and you can customize and build on it as per the application requirements. This feature allows user to save time and effort when creating workflows.
- Once user adds a workflow item, user can click on the item to get different options to customize and configure it as per the requirements. User can give a name to each item, customize the actions it performs, and configure the item to interact with other workflow items. User can add as many items as needed to complete your workflow.
Once the user has completed the Work flow designing, he can click on “Next: Assign Roles” at the bottom right corner of the page to continue with the application design process.